Thursday, September 20, 2012

223. Photo Diary

A week or a day in photos....


Post smoothie work out. I need to get some protein powder to
blend in there so its more filling.
Been trying to be good and hitting the gym more frequently and loading up on
more good stuff for you, I'm not the most healthiest person on the planet.
No sir I am not. But every effort counts to getting there.
Salads for lunch, smoothies and etc.
More water. Lets do it.


My friend still thinks Rilakkuma is pedobear.
I still think hes cute as fuck.
One of the ear on my pretzel bear  broke off.
I also broke off the cupcake on the bottom right corner next to the heart
It was bothering me. It now sits on my desk.
Other than that, this case is still alive and as cute as ever


Revlon Colorstay Liquid Lipwear in 001 Perfect Peony
Nudish Pink.
I dont like that it settles into the cracks of your lips.
Not very hydrating, but the color does last.
Probably best to prime your lips with a very hydrating balm.


Old...but nonetheless.
I got my BBs new cases so they gather less dust.
I still have to finish building a few other models before I can proceed to get more
I have 2 HG models I need to build.
One if 85% done. I just need to do it.


Mom went insane at Clinique when we went to the mall.
I can say I defnitely am a believer, this shit works.
Also, with the added new change to my diet.
My face has been clearing up better.
Now if only I can force myself to bed early enough to avoid dark circles.
I had the moisturizer before, but never a whole line. mhmm.


A friend loaned me this book. I need to finish it soon / get myself a copy.

Monday, September 17, 2012

222. Stan Lee Presents: Comikaze 2012!


Another year for Comikaze has come and gone, and I must say this year seemed to have had more attendees than last year! I guess the bump on advertising really helped attracted more and more people to come.

While driving down the freeway to LAX Convention center I did notice some advertisements on the side of the road advertising Comikaze Expo! WOAH good job guys!
Click on READ MORE to see the rest of the entry and photos from the con!


Saturday, September 8, 2012

221. Mall adventures

I haven't done a post like this in such a long time in a pathetic effort to make this blog look more....idk.....also probably because I haven't gone out of the house in so long LOL. Well, to the mall atleast since I feel like its always such a waste of time and I never get any thing there and always resort to ordering shit online. /:

But today was a different day LOL my mom dragged my ass to the mall coz she wanted to try and catch some deals and learn how to wear makeup xDlll......First stop was JC Penny and zomfg where I found some decent deals!!!


 Super obnoxious fun shorts for $10, such a steal considering their like denim shorts and was originally a hefty price. Hur hur hur. shamelessly got the gold denim shorts and the zebra prints below it. *u* One can never have to many obnoxious rock start style shorts HAHAHA. /forever obnoxious/

Some other items that I found interesting, I didnt't get a shot of the SNAKE SKIN jegging pants!! Want so bad but I didn't get it coz I wasn't down to spend that much cash. I wasnt expecting to see anything there tbh. The jacket on the right was nice, but cheap studs are cheap. Its going to fall off with enough wear /: and I do not approve of that ugly side paneling. Whats up with that?!


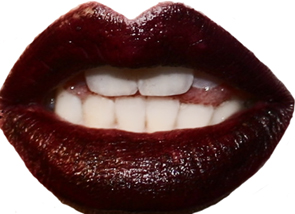
 Wondered off to Macys and Nordstrom to check out the makeup counters, my mom probably went through practically all the makeup counters there and finally settled with Clinic. She was on a quest to find a specific shade of lipstick. I was also on the hunt for a deep dark red lipstick reminiscent of blood red (think, deep deep red almost black - but after further research, impossible to find. )':


 Mom came out with a whole line of skin care stuff lol and the new BB Cream Clinique has. I personally wear the Missha one so I dont know how much the difference is with the Clinique one versus the Asian branded ones....the Clinique one has Anti-Aging properties and SPF. I think the only thing its missing from the Missha is the whitening properties.


Look somewhat of an outfit shot. LOL. Again, haven't done one of these in years! )':
cardigan type jacket?, Forever21 stud cross burn out tank and distressed denim skirt. Nothing special or standout ish since I've been pretty lazy in terms of coordination lately =3=ll I admire those girls who can dedicate their time to do this all the time. It was a chore just doing my hair and extensions today hahaha.

Stopped by H&M and grabbed some basic pieces; a maroon tube skirt and a loose tank. Which is basically my uniform for work LOL. Anything easy and basic that I can throw on when I'm late (which is everyday) a cardigan and off to work I go.

Then it was to Sephora since I was on the hunt for a super deep red vampire red lipstick. And from their website they were promoting dark red lips so I figured I'd pop into Sephora and pickup the reddest lipstick I can find. And I stumbled on this little guy, and on the top display it looked pretty deep. I tried it on the store and it looked pretty dark. It wasnt till after I paid and walked out that I realized its a deep bright matte color. and I mean BRIGHT


It almost looked pretty weird and awkward in my opinion. Might have to play around with it and see how I can wear such a bright bold color out. Its very....rockabilly. The only time I can see myself wearing this is for cosplaying Esther from Trinity Blood, even then I'm still unsure of this shade and I've gone through 2 different shades of red for Esther.
Red is such a bold statement lip. I probably shouldn't wear such bold eye make if I'm wearing this bright ass color, the color I was really looking for is this one below:


Which from what I can figure, is Manic Panic and I sure hope its pretty accurate and not PS altered )': will have to look into reviews on how long lasting this is and etc. OR I can be smart LOL and mix some eyeliner (black) with the red before applying it. I think I'll have to experiment with that technique so I don't end up with a platora of lipsticks I dont need

The sephora one I got, (sephora brand) lasted me a while, like with any lip color just be careful it doesnt get on your teeth. Now I'm going to have to figure out how to wear this bright red lip color so I don't waste my money on it LMAO. I mean, its not that bad but still. Was going for something super dark and gothy xD for a very goth coordi for PMX if I can't get my Rilakkuma Kigu together intime.

Some items I want but will have to come back for when I get the chance too, so hopefully its still there!! ;A;!!!!!!!


A red bomber style jacket??? I want it!!! D8 and them shoes!! I need both! And the back has a chain detailing! Absolutely need/want! It would look so good if I got the black snake skin pants, the red jacket and one of them sneakers ;A; win win win coordi. But almost doubt it I dont even know when I will get a chance to come back for them...le sigh...since I'm booked all weekends from now till IDK. lawlz. And lastly. Dem heels. THEM HEELS. 


220. Red Hair Adventures - Hit or Miss

Hair can be quite unpredictable - a lot of the time. There are several factors that can affect the outcome of your hair color. Hormones, virgin, color treated hair, pre lightened, darkened. Etc. All can play a major role in the outcome of your hair and like many things in life; its not always 100% certain.

In my previous post I talked about using Hi-lift color dye to retouch my roots to avoid having to use bleach and then having to go through the process of washing my hair, drying it, THEN reapplying the color. Honestly, sometimes thats THE only way to get your hair the color you want. But I decided to take a gamble and use hi-lift color. L'oriel Hi-lift color for dark hair, to be precise.

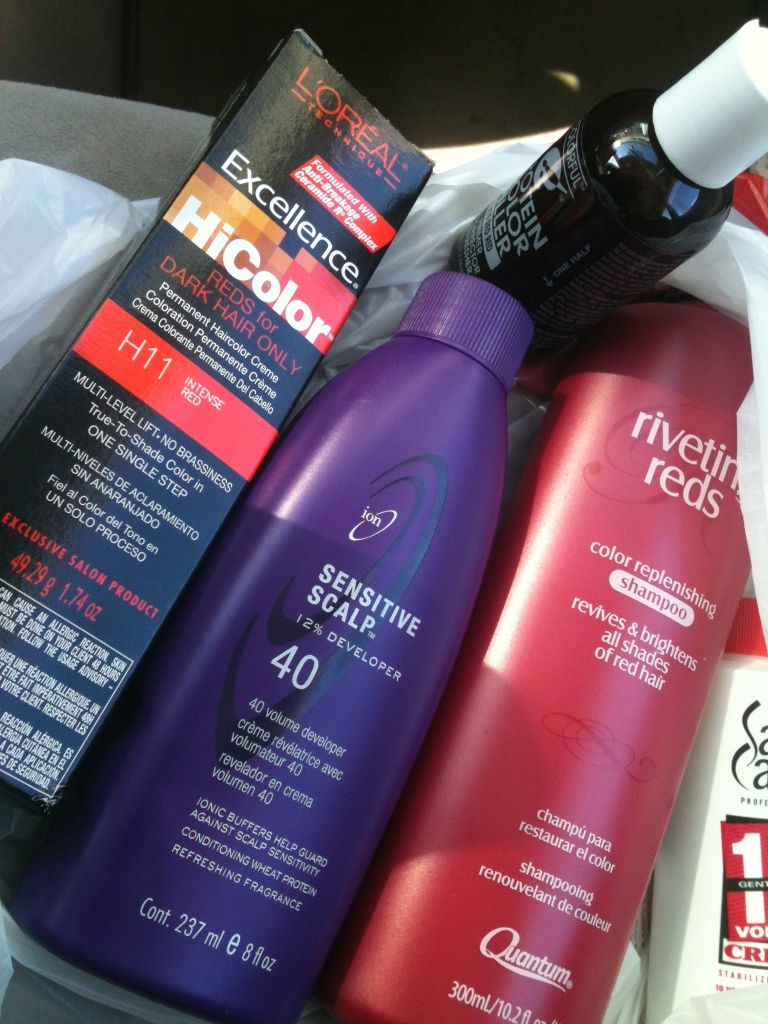
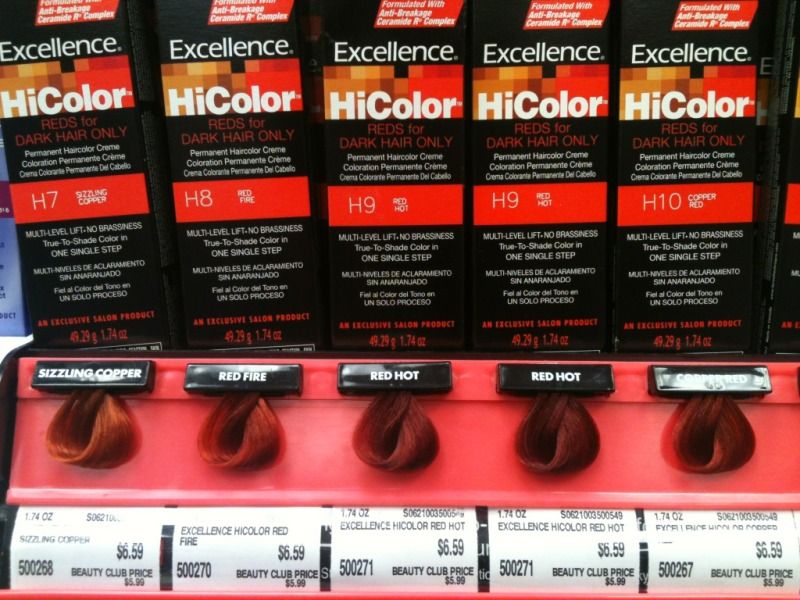
I got L'oriel Hi-Color in H11 - Intense Red

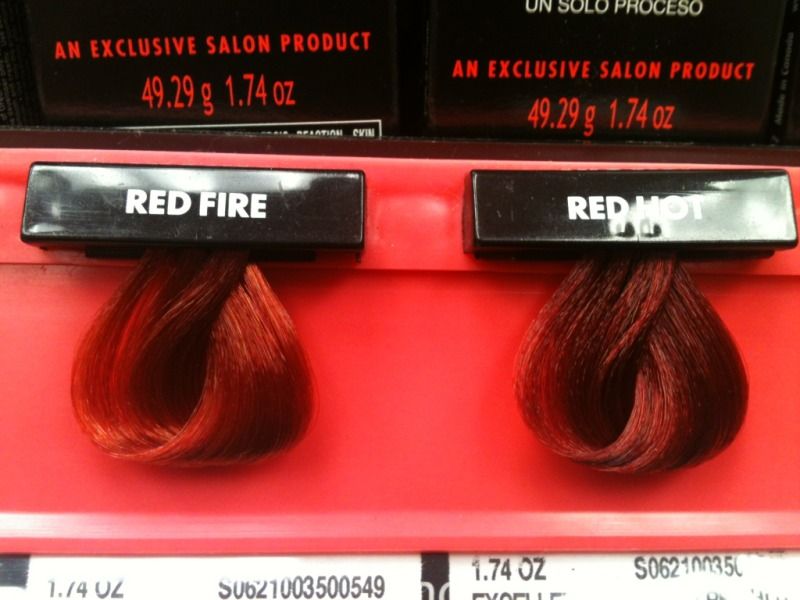
which upon further inspection, I should have gone for the brighter shade of red fire, which is more orange base than violet base. Which Intense Red, looks more violet base and even on inspection of my own roots - it is more violet base even with red protein fillers.


I actually took a video on this to try it out and honestly, I have more respect for V-loggers and youtube gurus. You definitely need a  whole set up to do this properly and it was a challenge and excuse me for the shaky camera and ungodly close ups )':

but like I explained in the video as well in my previous post. I mixed the dye using vol.40 developer. And let it process for about 20 mins. I should have let it sit longer honestly but I was afraid my roots would process too quickly and it would come out an intense bright color. This is probably one of the mistakes I did.

And then after letting that sit for a few mins, I went and applied Ion 7IR (Intense Red Blonde) over the rest of my hair shaft using vol. 10 developer (I had the bottle left over from previous retouches and figured - why not?) - again a possible mistake but it worked out alright in the end lol as if I had used the hi-lift on the rest of my hair shaft, even on a lower developer. I'm afraid it would have turned darker than I had wanted.

Also, one thing to note about these Hi-lift colors - they will NOT work if you have dyed your hair DARKER. It only works on virgin dark hair.  Meaning, NO color has ever touched that part of the hair.


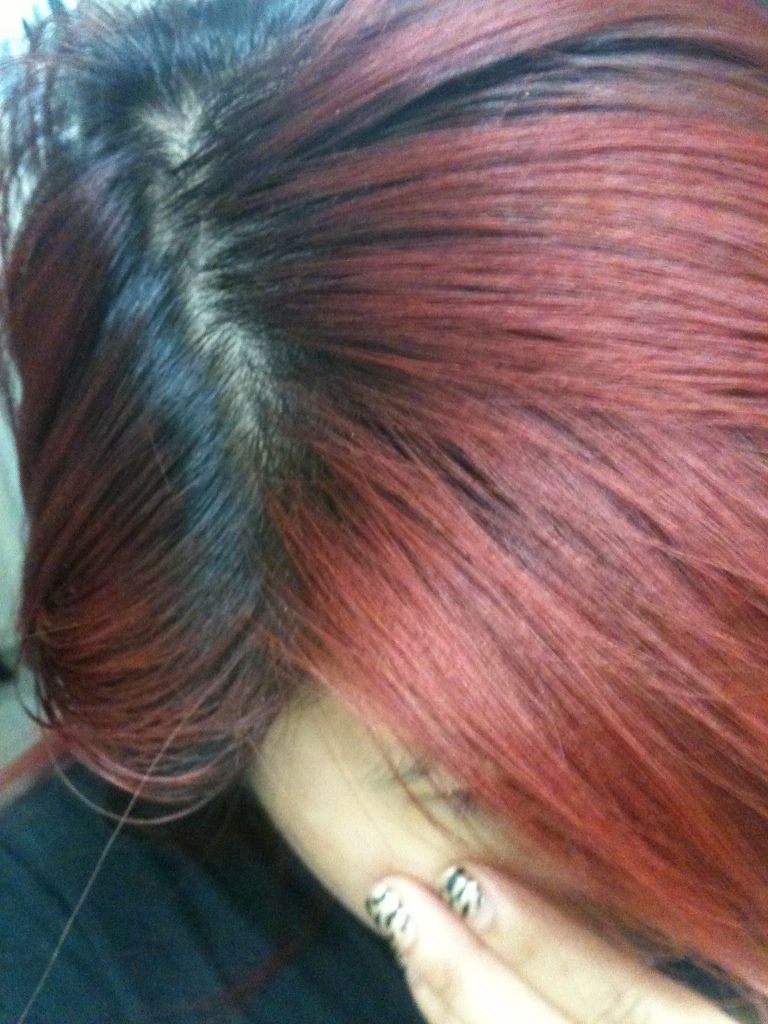
In the end, the roots on my crown turned decently ok. The rest of my roots - in the back where theres probably a good 2-3" maybe even 4" of regrowth just didn't cut it. Even when I started on the back first to give it extra time to process.

Lesson learned:

  • Go 2 shades lighter than your actual color. I was trying to color match it exactly as I thought it was. But gotta remember, I'm not pre lightening my hair and redepositing color. 
  • Let it sit and process a little longer. 
  • I'll probably use the same color for the rest of my hair shaft- just using a lower volume so it really helps make everything as even as possible.


Conclusion: I will give L'oriel Hi-lift ONE more shot before I absolutely call it quits and say we weren't meant to be LOL. I've had my hair a nice fire-engine red color before - which, to be honest IS MUCH easier to match since its just ONE solid bright red. Than when you have a specific shade of red on your hair. As a working class person - I can't walk around the office with my crazy intense fire engine hair like I use to when I was younger lol....(which you can see my hair color time line of red here)

I hope you guys find this informative, let my "mistakes" be your guide xD

Friday, September 7, 2012

219. Red hair adventures with hi-lift


Yeah why didn't download this app before ): lol in a sad attempt to use this more than tumblr o_oll and instagram. I usually prefer to do more cohesive posts versus posting random tidbit like these...

but I figured why not? At my lunch break I went to go pick up some *supplies* to fix my ugly roots D:
ugly. nasty and dirty roots. I've let them go crazy on their own long enough. The top isnt THAT bad but the back definitely looks like a hot mess. Thankfully being red, isnt nearly as disgustingly bad as when you have BLONDE hair. I remember having to redo my roots every 2 weeks...3 was pushing it for me. Sometimes I even went a month without having to do it. Thats dedication!


 And now red hair is another ball game, your biggest battle with red hair is color fading ): and then of course, like with any hair color....roots. And for a while I've always BLEACHED my roots, rinse, dry, then dye.
And on days when I am absolutely lazy, I just used vol. 40 with any red dye. I even went so far as to try Garnier red for Dark hair, yes, it worked but as you can tell, there is a slight color difference. Its definitely not as bright and vibrant as the other half of my hair. The middle shaft of my hair (2-3 inches from the roots) were done with Garnier, and inbetween that Garnier dye is Ion Dye with vol. 40.

And of course the rest - which are more vibrant were a result from when I would take the time to bleach my roots and go through the double process of doing it.

I was going to try and grow out my roots to get some sort of funky dirty gradient ombre black to red look. Lol. but no, my roots arent a jet black and therefore it just doesn't look good, especially if hair isnt a fire engine red as I use to have it back in college )': and just...no.

And after stumbling on this video:


I got a hard kick on the ass and decided, no the regrowths got to go! Not to mention Toshi also recently kill their hair lolol...so I guess its just that time of the month when you need to clean your look up.
lawl. Durp.

Watch that video, its very informative and quite similar to what I do - will be doing to my own head tonight. Just...a more visually appealing step-by-step way to do it for those who aren't interested in reading my ramblings. Yes.

So at my lunch break I took a trip down to Sallys beauty supply (I wish they had coupons out this week D8 but nooooo urgh) and dropped $26 of my hard earned cash on my hairrrr. Yes. red hair is a bitch to maintain, its also quite expensive to maintain. $26 ISNT that much to drop on your hair - I know a lot of people have spent more. )': but stilllllllll ( this is probably why my hair is shit hahahaha - actually I do like to splurge on my hair when I can coz,I need to baby this bitch. Now if only weaves werent an arm and a leg and I've probably been spoiled when I could buy stuff from the supply warehouses for super cheap when I was a student in cosmo school. I could get Biolage shit for $6 or 8. Was such a steal)

But yes, moving on to my haul from Sallys. Picked up another mini bottle of the red protein filler, which for some reason is always sold out when I'm there or they just dont  have enough of it in stock as I picked up the LAST bottle. AGAIN. WHY?! I still have half a bottle left at home but I don't want to be caught without one and have to go through the agony or ordering online lol....

More shampoo - which I'll still add the protein red filler in because I am meticulous about maintaining my reds, I should have picked up more conditioner but  I still have a bottle at home  which I am hoping would last me another 2 weeks before I am forced to get another bottle...(of course if I'm in a pinch I can just throw red manic panic + red filler into any conditioner and make my own)

And of course, dun dun dun, HI-LIFT RED COLOR. I avoided using high lift red color before because I just dont think its going to show up the same shade as the rest of my hair, or its going to just  be RED RED.
And the last time I used high lift red it turned my hair gummy. Disgustingly gummy and over processed...


But, I'm lazy and dont want to bleach and dye my roots. So, why not give Hilift color another shot. I picked up Red Hot and we shall experiment tonight and I will edit this post with the results :o


The box calls for vol. 30 developer, but I picked up vol.40 just because. And also vol. 10 for the rest of my hair to refresh the color (but I'll be using my usual shade from Ion 7RR for that)


Procedure: Section your hair into 4 different parts like in this video above demonstrated by David Mayeda. I personally do my own hair and it never comes this clean, but w/e its coz I'm ghetto and refuse to go to a hair dresser lol when I can do it myself.


Start with the back sections of your hair and work to the front, taking small sections in between. Also because as you can tell, my roots are the longest in the back than the front / top since I have better control to see the crown of my hair and the front sections. I'll only be using half of the tube to do my roots, or even just a quarter of it.


Let it sit and process for about 15-20 minutes - watch your head! Since the heat from your scalp will process it faster. And then quickly mix vol. 10 with your other hair dye (I'll be using my Ion 7RR dye for this one) and vol. 10 because I don't need to lift my color at all so I will not be using vol. 20. Its just to refresh the color and make it blend with my roots. Sit for 20 mins. And then rinse! Photos maybe tomorrrroowwww when I have my face on.

I'll leave you with a shameless photo of myself a few weeks ago with my mermaid weavess (no, their not long enough to be mermaid weaves coz these bitches are only 18" someday this hoes gotta get herself some 18" and 24" ones ):< want but urgh. So expensiiiivveeeee and I'm not made of money. And I honestly only wear these on the weekends coz no. Not about to do this shit everyday for work.


P.S: WHY ISNT THERE A LEGIT EYELINER DESIGNED FOR THE WATERLINE?! D8 /majorpetpeeeeve/ I'm going to hopefully check out Inglot tomorrow with mooother and pick up Inglot gel liner since I'm hearing decent reviews from them :o and see how well it lasts on my water line ):<

218. [Cosplay] Makeup 101 Glossary - Face Stuff

On my previous blog post regarding Makeup for Cons & Photoshoots I talked about the different products and stuff what to pack for your cosplay photoshoot or convention trip in general, but I realize I did not go into detailed lengths as to what each product does, what it CAN do, and the different types of them!

Here is also another article I stumbled upon online; Basic Information about cosplay makeup by Sado

But not a lot of these articles or even most makeup gurus don't really go into much lengths on what each product does - or can do. This most is mostly going to be dedicated to all my male cosplaying friends and those who are just getting into cosplay and whatnot. There are hundreds of other videos and tutorials about this on youtube that you can simply do a quick search on but I guess this can be you quick 'guide' or 'glossory' as to what each product does - can do, and etc.

I won't go into lengths on application - again, youtube videos will be your best friend :D

And just 'coz your starting to wear makeup or cosplay does not mean you need to break your bank by getting super expensive high-end products, but again. You would know your skin better than anyone and I would suggest maybe trying these products out a few weeks prior to know what can break you out and what doesn't /: no one wants to spend a whole weekend at a con only to find out the makeup they wore for day 1 cosplay ended up breaking them out!  There are quite a few drug store products and brands out there that are practically on par with most High-End brands, its just finding the right one that works for you!

Lets get started....


Primer:  Putting your makeup on is like painting your face, your face is your canvas and like with any canvas you have to PRIME the canvas to make sure the paint lasts and looks as good as it can be. And for this, Primer is your best friend. Make up primers are usually contain max,  polymers, and silicones - you have to read the back label to see exactly what each one contains. Primers help smooth your face out and helps fill in ridges with deep scarring to help make applying the foundation over the face smoother and helps last it longer and helps keep your oily face at bay!

Primer comes in different colors - most to help cancel out undertones or in clear complexions. Concealers also comes in different color tones meant to help even out skin tones as well, but if your looking for an all over cover. You can get yourself a primer that comes in a color tone meant to cancel your skin undertones.

Some are even advertised as 'moisturizing' and are 3-in-1's...there are so many out there.

Finding the right primer for you: Do your research ): is all I can say....

I personally have oily skin and have terrible red undertones so I like to use a green based primer to even out my redness, if you have yellow undertones you might want to use a lavender based primer. Or if you just have dull skin you can try using a swallow colored peachy one to help brighten your skin up (this works if your primarily fair skinned)

Concealer: Your best friend when it comes to hiding all those dark circles from late night sewing parties! Also amazing at covering up imperfections that foundation just can't cut!
Concealer works by targeting all those super pigmented areas that you want to cover up. Comes in creams, sticks and powder formulas much like foundation. But it gives a medium to heavy coverage as its purpose is to CONCEAL. And much like primer, it also comes in several shades. From skin tones to swallow peach, yellow and purple as well as green tones specifically to target really stubborn areas that needs some good coverage. Also the good thing about concealers are, a lot of them can come medicated to help heal and cover up acne flare ups.


Foundation: Consider this the next step to your 'paint' project.. And probably one of the most important things when it comes to cosplay photography and cosplaying in general - is to come out looking your best and to make your face as flawless as possible. But lets face it (no pun intended) we're not perfect but this helps give us that effect (the rest is up to Photoshop LOL)

Foundation helps even out your skin tone, covers up imperfection, and also helps make you 2-3 shades lighter (depending on what shade you wear)~

Foundation comes in different types and forms - application is more or less the same.

The most basic form foundation comes in are the following 3; powder (loose or pressed), liquid or cream/mouse.

And recently theres new airfoam foundations that have hit the market - I would not recommend these as when they oxidize, they tend to turn a different color and just does not give as even of a coverage.


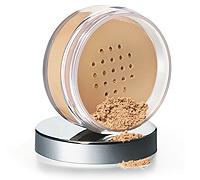
Powder: Powder foundation comes in 2 forms - loose and pressed. Loose meaning their not compressed in a pressed powder form (as shown above). Most comes in a small container like the one above and has a sifter inbetween to keep the product from going all over the place and making a HUGE mess. And for the LOVE OF GOD PLEASE DO NOT PRY OFF THAT PLASTIC SIFTER THING D8 ITS THERE FOR A REASON!!
(I had a friend pry that shit off coz they didn't now it was part of the packaging and needless to say it was terrible). If you get yourself one of these loose powers, just simply tip it up side down and TAP some of the product loose onto the lid it came in, and use a brush or sponge to transfer the product onto your face.

powder foundation is best to use if you have oily skin and aren't looking for something with heavy coverage. Loose powder gives a light finish and does not cover as much imperfection nor does it do much if you're trying to go a few shades lighter than your actual skin tone. I prefer to use loose powder or powder in general to help set my liquid/cream foundations. 

If you have DRY skin and prefer the lighter feels of powder - just put moisturizer before applying your foundation and you should be good and helps avoid that cakey effect.
Liquid: As the name suggest lol liquid foundation is probably the most popular form of foundation used and provides the most coverage. Easily medium to heavy coverage depending on the formula and I'd like to say the best to use when it comes to cosplay - especially if your looking to look a few shades lighter and is the easiest to work with. But also melts off the fastest lol, so, prime and set!

Cream / Mouse: Cream foundations are amazing and provides a medium to heavy coverage and very build able. It can be applied with your fingers, a wet sponge, or just a spunge or a brush. I usually find the best ways to apply these (also depending on its thickness) are with foundation brushes and wet sponges especially if it comes in a very hard pressed packaging. 
Its mouse counterpart - popularized by most drug store brands boast a light weight airbrush finish. Best applied by hand, and I suggest exfoliating and moisturizing before application as it can settle into the fine lines of your face and really pronounce dry areas x_X which you most definitely want to avoid especially in photos.


BB Cream: Also known as blemish cream, beauty balm and etc...., its a light to medium coverage 'foundation' popularized in Asia for its skin healing benefits. It was originally developed in Europe designed for patients who underwent surgery and still provide coverage for patients who can't wear foundation (mostly after laser surgery and whatnot as foundation contains chemicals in it that might not be too good for your damaged skin). BB Cream is pretty much a tinted moisturizer with skin beneficial properties; such as anti wrinkle, whitening and SPF protection.

I personally avoid using this for cosplay photography - unless you have perfect awesome skin LOL
since this gives such a light to medium coverage. Some BB creams are buildable but are designed for super light skin people, if you have yellow undertones, you might want to avoid BB creams unless you can swatch test them yourself and this mostly comes in 2 shades - light and SUPER light. /:
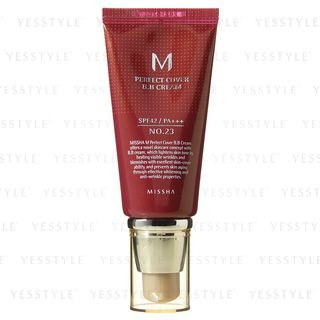
Only Misha is the only one to my knowledge that carries 3 shades and is what I personally use on my days off - or when I'm at work LOL coz I don't need to necessarily cake my face on.

BB cream also gives you a very dewy finish - which works for some and might not look TOO flattering on others. Always best to do a makeup test with this stuff. Sometimes the dewy finish can work to your benefit as you can skin the highlighter lol but I always suggest powdering this down to set and keep it from giving a overly dewy look.


Also one thing to note - BB cream tends to oxidize after wear and can cast a ashey overtone to your face. So if you are using BB cream as your foundation of choice, do a photo test. With flash, without flash, indoors and outdoors but be sure to give it a few mins to let it set and oxidize before attempting your face test just to make sure you don't look like a ghost in your photos.

(for more info on BB creams, click on the image above to be directed to a blog that breaks down all the different BB creams on the market right now if you're looking to try it out :D)


Bronzer / Blush: Bronzer and Blush powders are going to be your best friend when it comes to shading and contouring your face. It works magic on recreating your face and highlighting key points you want the camera to focus on. It will help redirect light, reshape your face, and it can also make you look like a doll or alien (or a burn victim xD)

What is contouring? What is shading? Highlighting? What the hell are you talking about woman?!

Contouring or shading is basically adding a darker color or pigment to certain areas in your face using a darker color as if creating a shadow to help /contour/ your face to look slimmer, make your cheeks more pronounced. Same as with HIGHLIGHTING. Highlighting is directing more light and focus to certain key points in your face.

You can search youtube for several tutorials on proper contouring and shading.

Bronzers: (also known as contouring powder) When people think of Bronzers, they think 'ugly sun burned skin' lol, thats probably because most people go over board with bronzers. No honey, you don't want to look like a bronzed up greek statue.( Chances are, you are no Adonis to begin with, lol, but lets be real)
Bronzers are easy ways to help fake a tan, a lot of the time you can get this in MATTE finish or a shimmer finish. For cosplay, I always suggest staying away from anything that shimmers. Especially if your using it for contouring and shading. Matte is always your best friend especially if you're going to be using highlighting shades....

**Tip: you can use matte eyeshadow to double as a contouring shade or use a darker shade of foundation as well, you DON'T need to buy a whole set of powders if you don't need to***

Highlight: This is the shimmer part of your palette. This is mostly used to highlight parts of your face where the light hits it just right, it helps bring attention to the right parts of your face.
Mostly comes in powder form like the bronzer. Comes in light colors such as white, cream and are mostly pretty translucent not too pigmented since you want to blend it.

Blush: There isnt much to talk about blush, it goes on the apples of your cheeks to give you some color, a nice peachy glow or rosey cheeks. It also gives a more feminine look to your cosplay if your looking at crossplaying as a girl XD (if your a guy, I mention this since I wrote this article with the intent to educate most of my guy friends lol)

The fun thing about blush is, it comes in so many forms and shapes as well! It comes in cream/mouse, LIQUID (its very runny and watery not like foundation), sticks and of course powder.

***Tip: you can use lipsticks as blush too! Best applied with your fingers as the heat from your hands will make it more pliable***


--------------------

And there you go, I hope this makes sense, I felt alittle rushed to finish it towards the end of the article xD as this has been sitting on my draft que for so long that I just wanted to finish it. Hahaha.

This should conclude the first portions of the basic Cosplay 101 makeup glossary. I didn't want to go too deep into details; ie: product recommendations and etc in this post as it would make it extra lenghty! but hopefully in the next few ones I'll be able to talk more indept about different products and provide product reviews.


I might go back and revisit this to update and re-edit later on if needed.


Wednesday, September 5, 2012

217. LIVING SOCIAL - STARBUCKS DEALS


Hey avid coffee drinkers :o
(if you're in the US I believeeeee), living social.com is currently running a deal right now for the next 6 hours on half off Starbucks gift-cards. Their selling them for $5 for a $10 giftcard! Thats huge savings considering how many people spend  $$$ on coffee, you might as well score yourself a good deal for half the price.

Link to purchase, CLICK *HERE* yeyeah :D